A Yogi’s Guide to Triangle Pose: Benefits, Form, and More
Reading Time: 5 minutes
BY: ISSA
DATE: 2024-05-30
Every yoga pose benefits the body in some way. Pigeon pose helps open the hips, for instance, while Camel pose opens the chest. But if your goal is to loosen tight hamstrings, Triangle pose is a good one to choose.
What Is Triangle Pose?
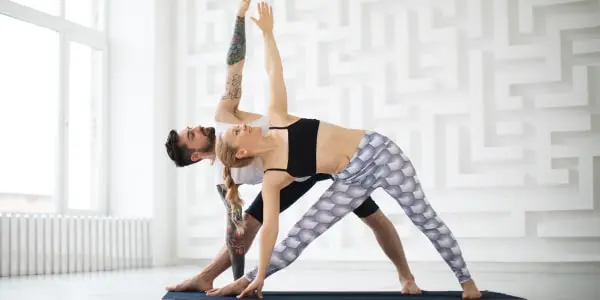
Triangle pose involves standing with the feet more than shoulder width apart, creating a triangle between your legs and the floor. You then bend to the side with one arm pointing toward the ground and the other toward the ceiling, creating a nice stretch in the back of the legs.
In Sanskrit, Triangle pose is known as Trikonasana. This name comes from tri, meaning three, and kona, which means corner. Add asana to the end and you have Trikonasana, which translates to ‘three corner pose.’
Benefits of this Yoga Asana
Triangle pose provides a great hamstring stretch. You can develop tight hamstrings if you sit for long periods, such as if you work at a desk or spend a lot of time gaming.
Runners also often experience hamstring tightness, especially if facing a course that is longer or more intense than their legs are conditioned to run. Exercisers with grueling leg-day workouts may develop tension in their hamstrings as well. No matter what is causing the back of your legs to tighten, Triangle can help.
This yoga posture is also good for stretching the hips and groin. This makes it good for improving flexibility. By leaning to the side, it opens both the shoulders and chest.
Research suggests that a yoga practice including this asana is good for relieving hip and lower back pain. It may provide positive benefits for people with several other musculoskeletal disorders and syndromes too, by:
Decompressing the low-back
De-stressing the hips
Releasing the glutes
Improving spine and pelvic mobility
Improving inward curvature of the spine (lordosis)
As a standing posture, Triangle pose helps improve balance and stability. Balance become more important with age, allowing older people to retain their independence and avoid fall-related injuries. So, in a way, Triangle pose contributes to healthy aging.
Step-by-Step Guide: How to Do Triangle Pose Correctly
Using proper form when doing Triangle pose helps avoid injury. To do it:
Stand with your feet more than shoulder width apart.
Turn your left foot out, so the toes are pointing toward the wall.
Turn the right foot in roughly 45 degrees.
Engage the leg muscles and turn the left knee so it’s aligned with the toes.
Pull your lower abdominal muscles in and up while lifting each arm out to the side.
Inhale while shifting your hips back and extending your upper body over the left leg.
Exhale and lower your left arm, placing the left hand on the lower right leg. For those with more flexibility, you can place your hand on the floor. For those with less flexibility, place it on a yoga block.
Turn the ribs toward the ceiling while raising the right arm overhead, palm facing forward. The right hand should be aligned with the right shoulder.
Look straight ahead while lengthening the neck. If this feels uncomfortable, you can also look at the right hand (the one pointing toward the ceiling).
Relax and breathe while pushing through the feet and extending the right hand overhead.
To come out of Triangle, inhale and return to the starting position.
Change your foot position and follow the same steps on the other side.
Mistakes to Avoid
If you lack flexibility, you may be tempted to bend the knee on the straight leg to help you better reach the lower leg or floor. However, this changes the posture and should be avoided. Using a yoga block allows you to retain a proper position, getting the most from Triangle pose while avoiding injury.
In the past, practitioners were advised to keep their hips aligned during Triangle. However, it’s important to allow the hip in the non-extended leg to roll forward during this pose. This means that if the left foot is turned out, the right hip rolls forward. If the right foot is turned out, the left hip should be forward. This keeps from placing too much stress on the lower back and sacroiliac joint.
When doing Triangle, also keep the shoulders back. Imagine the shoulder blades being drawn together. This helps keep the torso properly aligned.
3 Triangle Pose Variations
Triangle can be modified in a few different ways. Here are three to consider.
#1: Revolved Triangle Pose (Parivrtta Trikonasana)
Revolved Triangle involves more rotation in the hips and torso. To do it, you twist your body and place the opposite hand next to the extended leg on the floor, to the outside of the foot. For example, imagine that your right leg is extended, with the right foot pointing to the side. During this Triangle variation, you would twist your torso so you’re facing behind you, and then place your left hand on the floor on the outside of your right foot. The right arm would be pointing toward the ceiling, which is where the face is directed as well.
#2: Bound Triangle Pose (Baddha Trikonasana)
If you want to make Triangle harder, you can also do Bound Triangle. The leg stance of Bound Triangle is similar to that of the traditional Triangle posture. However, instead of the arms being extended to the ceiling and floor, they’re in a bind position behind the extended leg. This deepens both the lower and upper body stretch.
#3: Extended Triangle Pose (Utthita Trikonasana)
Extended Triangle is another more difficult Triangle variation. When doing this pose, the torso is lowered to the side more. This allows the hand to reach the toes. Advanced hip flexibility is required to get into this position. Flexible hamstrings help as well.
Who Should Not Do Triangle Pose?
Individuals with range of motion issues in their lower body may have a difficult time doing this pose. This includes those with osteoarthritis or an injury to the hip, knee, or ankle area.
This is because Triangle pose requires a large range of motion in these joints. According to one study, this pose required an even greater range of motion in the hip, knee, and ankle joints in the sagittal and frontal planes than both the Crescent Lunge and Warrior II poses.
Triangle also may not be recommended for people with head, neck, or back injuries. Staying in position can put stress on these areas.
Incorporating This Yoga Pose in a Sequence
In a yoga sequence, practitioners should be able to transition smoothly from one pose to the next. Because it shares a similar stance, Warrior II is a good preparatory pose. Extended Side Angle pose is another that fits well when placed before Triangle in a sequence. When coming out of Triangle, Half Moon is a good pose to transition into.
If you want to learn more about this pose and others, you can do so in ISSA Yoga & Wellness Academy’s 200-hour Yoga Teacher Training course. Whether you use this course to deepen your own yoga practice or want to learn how to lead a safe and effective yoga class, you’ll walk away with more yoga-related knowledge and skills. You’ll also know how to maximize this practice’s benefits!